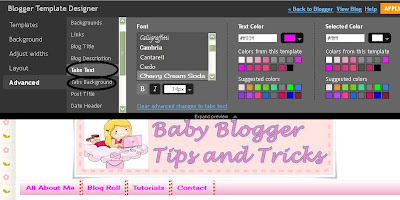
I recently want to change the look of my Baby Blogger Tips and Tricks blog considering that it looks so plain to me so I tried adding some navigational bar in it.
Here are the steps that I have done to add navigational bar in my blogger blog:
1. Go into your layout page and click on edit HTML
It's always a good idea to download a copy of your template before changing your HTML
2. You will need to look for the html code that needs to be edited below. Click Control F and search for the 1st code or the 2nd code
<div id='header-wrapper'>
<b:section class='header' id='header' maxwidgets='1' showaddelement='no'>
<b:section class='header' id='header' maxwidgets='1' showaddelement='no'>
Once you find this code . You will want to change the word 'no' to "yes' and the number 1 to a 3 (I put them in red color so it's easier to see!). After you have change the code it will look like this code below. Then Preview your work and if your contented with it click Save template after.
<div id='header-wrapper'>
<b:section class='header' id='header' maxwidgets='3' showaddelement='yes'>
<b:section class='header' id='header' maxwidgets='3' showaddelement='yes'>
What you just did was make it possible to add a widget to your header!
3. Click Add a Widget and select HTML/Javascript. In the text box you will copy and paste the html code for the navigation bar.
3. Click Add a Widget and select HTML/Javascript. In the text box you will copy and paste the html code for the navigation bar.
<center> <div id="newnavbar"> <ul> <li><a href="http://all-about-me.html">All About Me</a></li> <li><a href="http://blogroll-html">Blog Roll</a></li> <li><a href="http://tutorials-html">Tutorials</a></li><li><a href="http://contact-me.html">Contact</a></li> </ul></div><center>
If you want more links for your navigation bar add the code below with the appropriate URL address and place it BEFORE </ul></div> toward the end of the code.
<li><a href="http://Adding.more.links.html">Adding Links</a></li>
RED- is where you put the url address that is specific to your blog!
If you want more links for your navigation bar add the code below with the appropriate URL address and place it BEFORE </ul></div> toward the end of the code.
<li><a href="http://Adding.more.links.html">Adding Links</a></li>
RED- is where you put the url address that is specific to your blog!
BLUE- is what you want that link to say!
Now we need to edit your html code in order to get the links to appear in a line on your page instead of a list!. Go into your layout page and click on Edit html. Once again if you haven't done so download a copy of your template
4. Look for the Header section of the CSS code. It should look something like this:
4. Look for the Header section of the CSS code. It should look something like this:
5. Copy the code and paste it in the header section of your html code.
Paste it after a bracket that looks like this }
#newnavbar ul li{
font-size: 200%;
font-family: verdana;
display:inline;
padding: 15px;
margin: 15px;
margin-right: -10px;
}
#newnavbar li a{
color:#2cae1f;
}
#newnavbar li a:visited {
color: #cb2a2f;
}
#newnavbar li a:hover {
background: #b2c74f;
}
font-size: 200%;
font-family: verdana;
display:inline;
padding: 15px;
margin: 15px;
margin-right: -10px;
}
#newnavbar li a{
color:#2cae1f;
}
#newnavbar li a:visited {
color: #cb2a2f;
}
#newnavbar li a:hover {
background: #b2c74f;
}
You can also tweak the padding and margins to fit the need of your blog! It may take some playing with numbers and hitting preview until you get the spacing of the bar the way you like it!.Or you can also change the color of your Navigational bar by going to BLOGGER TEMPLATE DESIGNER click Advanced then click Tabs Text and Tabs Background to change color of your NAV Bar.


No comments:
Post a Comment