Wednesday, June 1, 2011

Submit your Blogs to more than 250 Social Bookmarking site in one click

I considered blogging as one of my passion so I tried reading loads of stuff every day and when I know something worth to share I blog about it. While searching the net I come across this site wherein you can bookmark your site/blog in more than 250 bookmarking site. So if you have no money to hire a virtual assistant to do this for you why not spend few of your time doing it on your own. What you need to do is to make sure that your registered in any of the bookmarking site before using this program. Anyway I will share some video tutorial which I found in the net which can help you in using this social poster for bookmarking your site/blog. If you know a little of SEO you will surely know the importance of submitting your site/blog in different social bookmarking site because it can help you gain traffic at the same time it can increase your pagerank.

How to use Social Poster in Bookmarking site Video Tutorial


Let me add something that manual submission is still the best form of adding or submitting your site/blog to social bookmarking site, but if you have no time and you are in a hurry to do more important things then social poster can help you in submitting your site and blog in social bookmarking site. So I hope that what I have shared can help your blogging experienced more fun and exciting. I am still new in blogging, but whenever I will find something new and helpful I will surely share it with you.

Simple Tips in creating Navigational Bar for Blogger Blogs

I recently want to change the look of my Baby Blogger Tips and Tricks blog considering that it looks so plain to me so I tried adding some navigational bar in it.


Here are the steps that I have done to add navigational bar in my blogger blog:


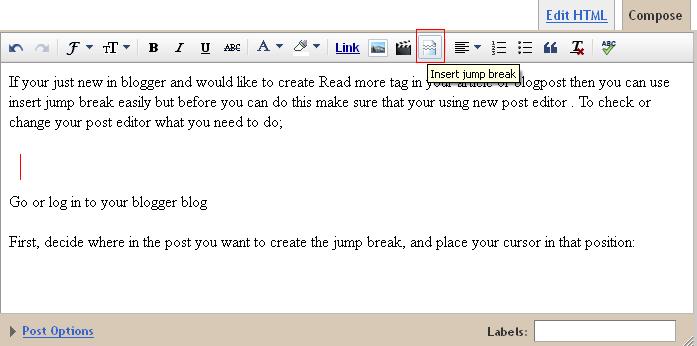
 1. Go into your layout page and click on edit HTML


It's always a good idea to download a copy of your template before changing your HTML


2. You will need to look for the html code that needs to be edited below. Click Control F and search for the 1st code or the 2nd code 

<div id='header-wrapper'>

 <b:section class='header' id='header' maxwidgets='1' showaddelement='no'>

Once you find this code . You will want to change the word 'no' to "yes' and the number 1 to a 3 (I put them in red color so it's easier to see!). After you have change the code it will look like this code below. Then Preview your work and if your contented with it click Save template after.


<div id='header-wrapper'>

 <b:section class='header' id='header' maxwidgets='3' showaddelement='yes'>


What you just did was make it possible to add a widget to your header!


3. Click Add a Widget and select HTML/Javascript. In the text box you will copy and paste the html code for the navigation bar.

<center> <div id="newnavbar"> <ul> <li><a href="http://all-about-me.html">All About Me</a></li> <li><a href="http://blogroll-html">Blog Roll</a></li> <li><a href="http://tutorials-html">Tutorials</a></li><li><a href="http://contact-me.html">Contact</a></li> </ul></div><center>


 If you want more links for your navigation bar add the code below with the appropriate URL address and place it BEFORE </ul></div> toward the end of the code.


<li><a href="http://Adding.more.links.html">Adding Links</a></li>


RED- is where you put the url address that is specific to your blog!
 
BLUE-  is what you want that link to say!


Now we need to edit your html code in order to get the links to appear in a line on your page instead of a list!. Go into your layout page and click on Edit html. Once again if you haven't done so download a copy of your template 


4. Look for the Header section of the CSS code. It should look something like this:


5. Copy the code and paste it in the header section of your html code.


Paste it after a bracket that looks like this }

#newnavbar ul li{
font-size: 200%;
font-family: verdana;
display:inline;
padding: 15px;
margin: 15px;
margin-right: -10px;
}
#newnavbar li a{

color:#2cae1f;
}
#newnavbar li a:visited {
color: #cb2a2f;
}
#newnavbar li a:hover {
background: #b2c74f;
}


You can also tweak the padding and margins to fit the need of your blog! It may take some playing with numbers and hitting  preview until you get the spacing of the bar the way you like it!.Or you can also change the color of your Navigational bar by going to BLOGGER TEMPLATE DESIGNER click Advanced  then click Tabs Text and Tabs Background to change color of your NAV Bar.

Simple ways to Center your Header in Blogger


I have already created my Header blog, but I do not like its placement because it's hanging over to the left. I am planning of changing it in simple way I could.


Simple ways to do this: 

Step 1: Upload your Header image


Step 2: Go to your Template Designer > Advanced > Add CSS (see below), and add this code:


.header-outer {
margin-left:120px;
}


Now you will need to adjust the “120″ value, depending on how large your header is, and how wide your blog is, so just play with the number until it looks right.  (smaller #s will move your header to the left, and larger #s will move your header to the right) . So preview your work first before on what value will suit your blog  before clicking apply to blogs.

How to Create Custom Header in your Blogger Blog?


I am just a new to blogging and I am still in quest of knowing and improving different stuff in my blog. I tried to read everything I could find in the net and when I find something useful and if I learn something new I blog about it. I have done some research about creating some custom header which I can use in my blog because it is very important if you want to improve your blog appearance. Today I have learned how to create Header in my blogger blog. Make sure that when creating your header keep in mind the theme of your blog. Anyway I will share some videos or tutorial videos which I have found in the net today about creating a custom Header using Netpaint.


 This video is about tutorial in creating your header using Netpaint so if you want to download this free software for Digital Editing you can use this one http://www.getpaint.net/


Another Free software that you can use in creating your custom Header is Photoscape;

In creating your Custom Header using Photoscape here is the things you need to do;

Step 1: Download this Free Program called “PhotoScape” : http://www.photoscape.org/ps/main/download.php


Step 2: Open PhotoScape, Click on “Page” Then, Click on “Edit”. You can change your white background color if you want!


Step 3: Click on “Resize”, uncheck the “Preserve aspect ratio” box and choose your size.

-Baby Blogger Banner Image is 760 pixels wide and 100 pixels high.Blogger Banner Image can vary from 1000 pixels wide and 400 pixels high to 800 pixels wide and 200 pixels high. {It all depends on the size you are looking for! So play with the numbers for a bit}.


Step 4: Lets start working on your Header! Lets start by choosing a font, Click on “Object” then “T”; Now you can type whatever you like and click ok.


Step 5: You can also add pictures and borders to your design, just follow the instructions on the photos:


Step 6: Log in to your blogger account, Click on “Design” and follow the instructions on these photos.


How to create Read more tag in your blogger post?

If you are new in blogger and would like to create Read more tag in your article or blogpost then you can use Insert jump break easily, but before you can do this make sure that you are using the new post editor.


To check or change your post editor here is what you need to do


Go to your blogger blog or log into your blogger account then click Settings 


Click Basic and scroll down your page until you reach Global Settings


Select post Editor and choose Updated editor (Recommended) and Save Settings . 
Now you have updated your Editor and can use the Insert jump break in your articles or blogpost.


First, decide where in the post you want to create the jump break, and place your cursor in that position


Once your mouse cursor is placed at the jump point, simply click the Insert Jump Break toolbar icon:


Clicking the icon will insert a grey bar at the cursor point, illustrating where in the post your break will appear. The bar can be dragged though, so you can always re-position it after insertion .


After publishing, you will notice that the Read More link is placed where you set the jump break: